Been a while since my last post. I've been tinking away on some new C++ code. The old code that ran the GPS experiment is pretty primitive and very specfic. So in preperation for switching over to dead-reckoning I am trying to make some nice clean and fresh code. So far progress has been a bit slow because of the holidyas and a new role at work. However, I have made some nice data types that encapsulate the concept of a robot pose and a kalman float that encapsulates the concept of an associated sigma value and the kalman filtering process itself.
Once I get some fo these basic types I can turn my attention to the basic code flow of the robot: absorb data, compute plan, execute plan.
Tuesday, December 06, 2005
Tuesday, November 15, 2005
GPS
I'm in Atlanta this weekend and happen to be riding in a rental with a GPS. I've been watching the GPS an notice that is occasionally screws up the heading really really bad. It can get completely turned around. Of course, we are amongst sky scraper and the bot is in a park, but the signal strength is still not good according to the GPS. I have my two-axis accelerometer+gyroscope IMU board and I've been studying up on dead-reckoning via encoder. I have even layer out a basic data flow model for a kalman filtering algorithm that incorporates GPS, IMU and encoder. Still, I might yet try to elevate my GPS antenna one more time as I think it may be a while before my current software plans become drivable. Also there is the Builder's Day Out this weekend and I like to have something that is closer to working that what I currently have. :)
First Place Loser!
The Chibots semi-annual competition was this past weekend. I just brought the ancient Uno in. I really need to finish my other sumo. Anyway, I went up against Black Cheddar in the first round and was knocked out. The bot is so black that my IR sensor can only see if its within 5 or 6 cm. Since there were some many Sumo's they went for single elimination. I thought I was done. Then later they felt bad and had a losers bracket for all the first round knock-outs. Uno won that bracket! So as a grand finale to the Sumo they put the first place winner up against the first place loser! (Me!) Who was first place winner??? Black Cheddar, of course. *sigh* It was a quick death.
Sunday, November 06, 2005
GPS Follies
Bah. I tried the GPS code again. I was pretty sure the turn rate was just too high for what I was trying to do. So I lowered the turn rate and took it out again. Once again I was beset with technical difficulties. The bot ran twice and just sort kinda went in the right direction, but I still wasn't happy with it. To make matters worse, the program would not run everytime. There was some issue with getting blocked on the serial port. I guess either the motors or gps were not responding. Dunno. Anyway, the upshot is that the two times I did run I didn't get log files because I didn't pipe the output to a file. So I don't really know what was going on. I could be that the math is just not precise enough or the heading updates were still too slow or whatever. I don't know and I am ticked that I don't have a way to look back and find out. I should alter the code to directly write to a file. I should also abandon this GPS thing and get on with dead reckoning. I only did the GPS again because it was such a simple change to the code to slow down the turn rate.
Sigh.
Oh well. Back to the drawing board.
Sigh.
Oh well. Back to the drawing board.
Monday, October 31, 2005
The GPS log files
Well the GPS log files confirm that the data coming from the GPS serial port changes no more often than 1 per a second. Looking back though the newly discovered PDF version of the GPS programming manual I see that it expressly states that the GPS computes a position solution only once a second in its performance spec section.
The turn rate and short (90ft) distance I had the bot going won't do with that kind of update rate. If I want the test program to really work I will need to slow the turn rate way down and probably the the overall speed as well.
I'm not sure if I'll bother since I think I understand the issue pretty well and the time might could be better spent coming up with a new dead-reckoning+GPS based program. The motor controllers are all wired to do closed loop control on the motor velocity. I just have to set the jumper and write a program to set a new heading based on a timed difference in left/right wheel velocity. I could even double check the new expected heading with the GPS.
Saturday, October 29, 2005
GPS Navigation
Well it was a fine day for bottin'! I took the bot out with its new correctly GPS goal and let it rip. It even sorta drove vaguely in the correct direction. However, it did a lot of loop'd'loops and meandering too. I tried speeding up the rate at which I request data from the GPS and the rate at which I controlled the motors but it didn't really seem to help. I haven't been through the logs thoroughly but I suspect that what I'm going to find is the actual content of the GPS messages are not changing very quickly at all. Maybe once every 5 seconds. That is to slow to directly control the robot. I think I will now have to add in a dead reckoning component. I should start thinking about the general mechanism to navigate before I do however. I'd like to avoid writing a big program that has to be trashed because its not architected well enough.
All in all however, I am very pleased to have seen the robot drive around and at least attempt to reach its goal. The fact that the GPS is likely too slow to directly control the robot is a decent experimental result for today. Its is not some technical failing of mine.
All in all however, I am very pleased to have seen the robot drive around and at least attempt to reach its goal. The fact that the GPS is likely too slow to directly control the robot is a decent experimental result for today. Its is not some technical failing of mine.
Thursday, October 27, 2005
Distance Calcs
Dammit! Just got a chance to review the logs from the last outdoor run. At the time I was mystified as to why the distance to goal function was returning hundreds of thousands of meters. The answer: when you put in your longitude you're supposed to put in negative numbers for western longitudes. Duhhhh. My goal was on the other side of the frickin' world, literally. Jeez. To be thwarted by something so asinine!!! Its dark now, but I really want to take the bot out anyway. I won't but I can't wait for my next chance to do so. It should really work!
Sunday, October 23, 2005
Rained Out
Well I was making good progress until it started to rain. The GPS serial code needed some tweaks. But then when it ran I started getting huge distances to my target way point. So something is clearly wrong with the distance computation code. I'll have to go over it again.
Maze Bot Update
I guess I should mention that I am not working on the Maze bot until I finish the RoboMagellan bot. Id on't have enought time for even the RoboMagllean let alone both RoboMagellan and Maze. So, the RoboMagellan is the way cooler contest. So that is what I'm going to work on.
Rise from the dead!
Since its near Halloween I guess it is appropriate to resurrect this blog. Its has been totally dead because all I have been working on is my RoboMagellen robot and its supposed to be a secret. But as the guy who most wants it to be secret is not really adding much to the robot. In fact only Paul, Tom and I have really done anything directly towards the bot, I feel I can go ahead and post here while I wait for my battery to re-charge.
My time is soooo limited its sick. My progress has be horrifyingly slow. I literally steal time to work on the bot.
Anyway, I have some code now that should drive my bot toward a GPS way point. I think I have finally mastered the Linux serial port scheme. It took a while to get it right though. Once the battery re-charges I'm going to take the bot outside and give it a go.
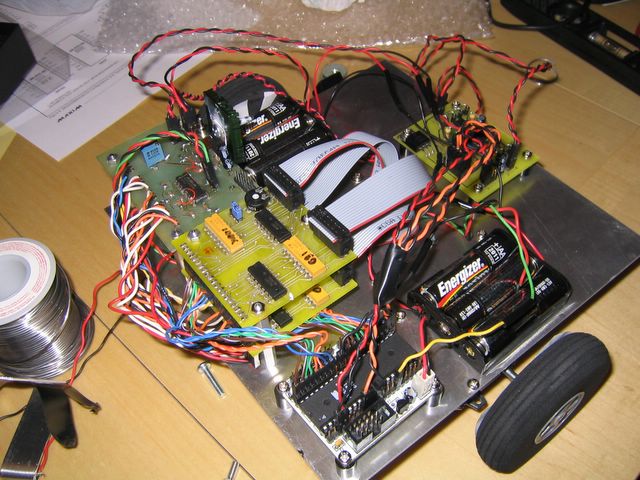
Right now I'm seem to have a custom carrier PCB for my GPS that works despite the need to cut it up all to hell and back because I got the connector backwards. The motor serial code is finally seems to stably command the motor controller. The worst problem is the the very first command after power up always seems to error out. Easy enough to send an initial stop command. I also have Paul's 933Mhz SBC running Puppy Linux and interfaced to the custom PCB that level shifts for the GPS and motor controllers. The code compiles. It has undergone some testing. It really should work.
Wish me luck!
My time is soooo limited its sick. My progress has be horrifyingly slow. I literally steal time to work on the bot.
Anyway, I have some code now that should drive my bot toward a GPS way point. I think I have finally mastered the Linux serial port scheme. It took a while to get it right though. Once the battery re-charges I'm going to take the bot outside and give it a go.
Right now I'm seem to have a custom carrier PCB for my GPS that works despite the need to cut it up all to hell and back because I got the connector backwards. The motor serial code is finally seems to stably command the motor controller. The worst problem is the the very first command after power up always seems to error out. Easy enough to send an initial stop command. I also have Paul's 933Mhz SBC running Puppy Linux and interfaced to the custom PCB that level shifts for the GPS and motor controllers. The code compiles. It has undergone some testing. It really should work.
Wish me luck!
Sunday, June 26, 2005

I forgot to post that my new robot shop is up and running. Its in the basement! I'm hopeful it will mean less clutter since it is not in the computer room any more. Also, as I live on the first floor I shouldn't feel bad running the scroll saw to cut my chassiss. Also I'm making an effort to keep the place neater so that I am not looking at a thirty minute clean up operation before I begin a new project. Lord knows that can stop me in my tracks! Of course, being out 2 1/2 weeks out of the first month I've been in the new place has not really helped. But still I have high hopes.


So, after a long delay that new maze bot is starting to take shape. The old bot was just too much of a disappointment to continue working on. Nothing I did seemed to help it steer. This bot hopefully has better motors and a lighter weight construction. Also the geometry should be a touch better in the height to base ratio department. I still can't find my postal scale to measure it but it feels lighter.
Wednesday, March 16, 2005
Tamiya gearmotors to go!
The higher frequency didn't help at all. It seems to turn suddenly sometimes and I really thing that is related to the increase in resistance to hand-turning the wheels sometimes. You can rotate the wheels easy for a bit, but then it will suddenly get hard. It doesn't do it as much if you rotate the wheels fast, but it sure is noticeable rotating them slow.
I can't be sure that is the problem though. I guess maybe I should wait to get Mike's encoder kits so I can confirm that the speed of the bot is not changing in phase with the speed of the of the PWM. In the mean time I'll investigate mounting wheels to other motors. Maybe the nice ones Tom gave me.
I can't be sure that is the problem though. I guess maybe I should wait to get Mike's encoder kits so I can confirm that the speed of the bot is not changing in phase with the speed of the of the PWM. In the mean time I'll investigate mounting wheels to other motors. Maybe the nice ones Tom gave me.
PWM Speed?
I was looking over a page full of links that Terry posted on Chibots and saw one called something like: choosing the correct frequency for a PWM motor. I popped over and basically it said about 9kHz to 25kHz for motors under 2Amps. I looked up my code and determined that I was using Fast PWM mode with a prescale of 8. At ~8Mhz (internal osc) that comes out to 3.9kHz. The next lower prescale option was 1, however, and that would have put me at 31kHz.. too high. It turned out that I could get a factor of about 2 in there simply by using Phase Correct PWM instead of Fast PWM. So now I can do a prescale of 1 and get a 16kHz base freqency at 8Mhz on the MCU. That's right in the suggested range. The real questions is, will it make much difference to the motors' reaction times? (Assuming reaction speed is really whats wrong.)
It could be that my bot is just too damn heavy. It's like 30oz.
Another thing I can try it to change the gearing on the Tamiya. I'm not sure I have the gears or the manual that tells me how to do that any more so I might have to buy another just for that. I can't remember if I put the gearbox in high-torque or high-speed mode. It was a LONG time ago. Tonight I will look for the box and if I can't find it I will pop over to HobbyTown to get another one before the Sat. BDO.
Friday, March 11, 2005

Nothing I do seems to have much effect on the behavior of the bot. There is always this long delay before a change in PWM output shows up in the line postion detection. By then it is way too late and the bot is wildly out of control. I am increaseingly convinced that my motors are way under powered for this application. I wish I had some encoder rigged so that I could verify a difference between PWM output and motor responce.
Thursday, March 10, 2005

So Tom gave me these really cool gear motors that I suspect are much better than my plastic Tamyias. With the longer stand-offs for the IR sensor they will now fit on my bot. The issue of course is affixing the motors to the chassis and a wheel to the motor. I'll need a specific radius and width wheel for my IR sensors. How shall I find such a wheel? How wil I also make it match the shaft?
Saturday, March 05, 2005

Maze Bot Under Own Power
Today is a good day. The maze bot is running under its own power!! Right now it is running a debug program designed to get it to follow a line. The Tamiya gearmotors seem to have a lot of variability and even seem to jam occasionally. That really sucks. I may have to ditch them. I hope I can find replacements that will not screw up my geometry too bad.
Tuesday, March 01, 2005
Minor update. I've screwed a nice big chipset heatsink onto my 7805. It just gets warm now instead of scalding hot. :) Also got my reversed sensor cables to the MPU fixed. I have calibrated the senstivity for my apartment and am getting good individual detection from each sensor with no light shield. I'm sure perfromance will degrade under flouresents but I can deal with that later. Finally I fab'ed a cable between my MPU and H-Bridge. Just have to connect the motors to the H-Bridge and the wiring on this bot is DONE! I will sure be cool to see it try to follow a line for the very first time. I wish it didn't take me the million years it did to get the bot this far along though. Hopefully some experiance and the BDO facilities will help overcome my various barriers. Anyway, tommorrow its off to Atlanta for two days so no bot stuff. However my gf and I decided to take this weekend easy since last weekend was so crazy. Hopefully I'll get to fire up the bot under its own power this weekend!!
Monday, February 28, 2005

Some progress on the bot. A simple thing really but big for me because I am so horrible at mechanical stuff. I had planned to go to Home Depot to get the drawer knob but with all the snow I decided against it. So, I tried to canniblize the knob on my CBABot. I'll have to get a replacement from Mike. Anyway to my surprise I was able to find a standoff of almost the exact correct length that fit into the knob! My robot is now balanced pretty well. The sensors are all equi-distant from the ground. Meaningful testing of the bot is coming soon. I can feel it. I just need to put on light shields on and hook up the H-Bridge to the MCU. After that, its all software. :)
Monday, February 21, 2005


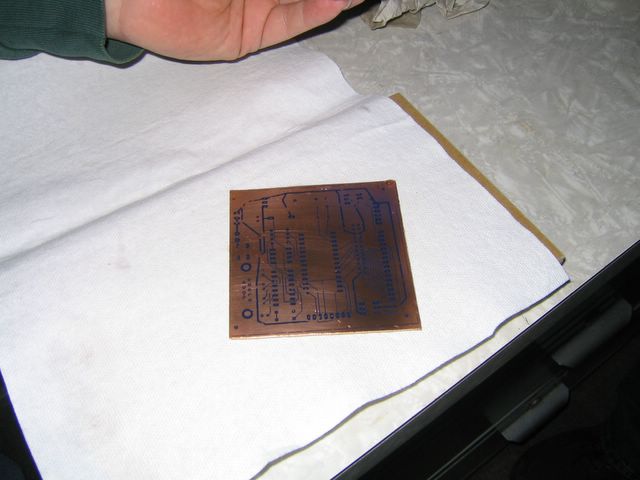
WooHoo! The etched board is a sucess! All the circuits are up and running now. In the photo the debug program in the microcontroller can be seen pumping out the detection state of the IR line sensors over the MAX232 on the etched board. This has left me with a fairly positve feeling about hand etching. I will definately do it again.
Sunday, February 20, 2005

Well, I forgot my camera for this month's BDO. Nonetheless it was a blast once again. Shown above is the product of my efforts! This is my newly etched power distribution board! It had a few troubles: the sides were not perfectly aligned and that meant that a couple traces that passed near pads got shorted to the pad when I put the component in. Also I left a few traces hitting thru-hole pads on the top side. These were difficult to solder. I learned that I need to use bigger traces, keep traces well away from thru hole pads and only connect to thru-hole pads on the bottom.
Saturday, January 15, 2005


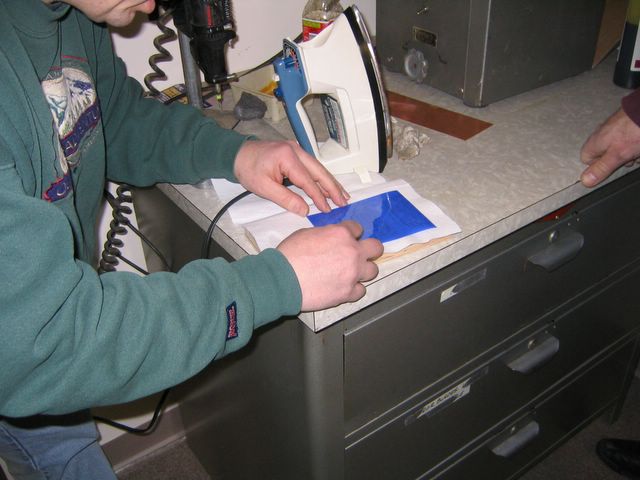


The main attraction of the day was, of course, the PCB board etching demo that Mike and Tom put on for us. In the left you can see the dremel drill press that we used to drill out the holes once we'd etched a board. The blue object is the press-n-peel print out. Right above that you can see some copper clad boards, a coke bottle with Ferric Chloride etchant and a precision white board manipulator. Further to the right, the larger grey box is an agitator. When switched on the top portion would rock back and forth gently. Sitting on the agitated surface is a hot plate and on top of that a plastic tray with some ferric chloride in it.
Posted by Hello
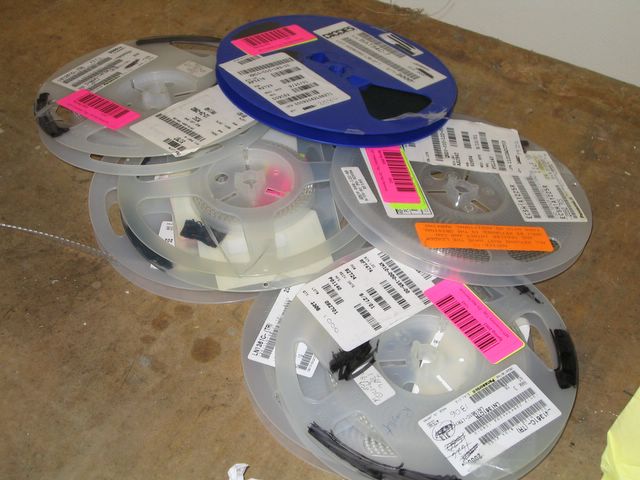
Tom donated a slew of SMD parts to the club. Since I am starting a library of SMD parts as a part of my transition from point-to-point perfboards to etched board he gave them to me to keep. There are green and red LEDs, diodes and some three pin device that might be a transistor. I'll try to get them cataloged soon. There are probably 500 to a 1000 of each.
Posted by Hello

I arrived in fine style with my rolling 2 story tool box. I think that little sucker is going to work out! I had two bots a soldering iron and more inside. That coupled with my component carrier that you can just see behind the toolbox makes for a mighty portable little bot station.
Posted by Hello

An O-scope made an appearance at BDO this time. No-one quite got around to giving it a try though.
Posted by Hello

Mike had his Therimin bot out and about again. He has two plates in front this time instead of the old antennae. However the sensitivity only seemed a touch better.
Posted by Hello


Well it was BDO time again. I was a bit late this time. Um, unavoidably detained, let's say. Nevertheless, BDO was good fun as always. Here we see some BDO regulars ponder matters 'bot.
Posted by Hello
Subscribe to:
Posts (Atom)